Virtual Schlüsselgerät 41 (SG-41) Tutorial
Virtual Schlüsselgerät 41 is an accurate 3D simulation of the SG-41. This page will take you through instructions on the basics of how to unpack and use the machine, how to encipher and decipher a message and how to set up the internal and external keys.
Moving the viewpoint
When you first start the simulation, you'll see the SG-41 in it's folded mode having just been removed from it's carry case. You can look around the machine by clicking your mouse (or finger if you're using a touch device) onto anywhere that's not on the machine itself, eg the table/floor and then drag around. To translate (ie, to move your location relative to the machine), hold down the shift key and then click and drag around as before. To zoom in or out, you can use your scroll wheel if you have one or pinch with two fingers. From now on, I'll assume you're on a PC/Mac with a mouse and keyboard to keep it simple.
Interacting with the SG-41
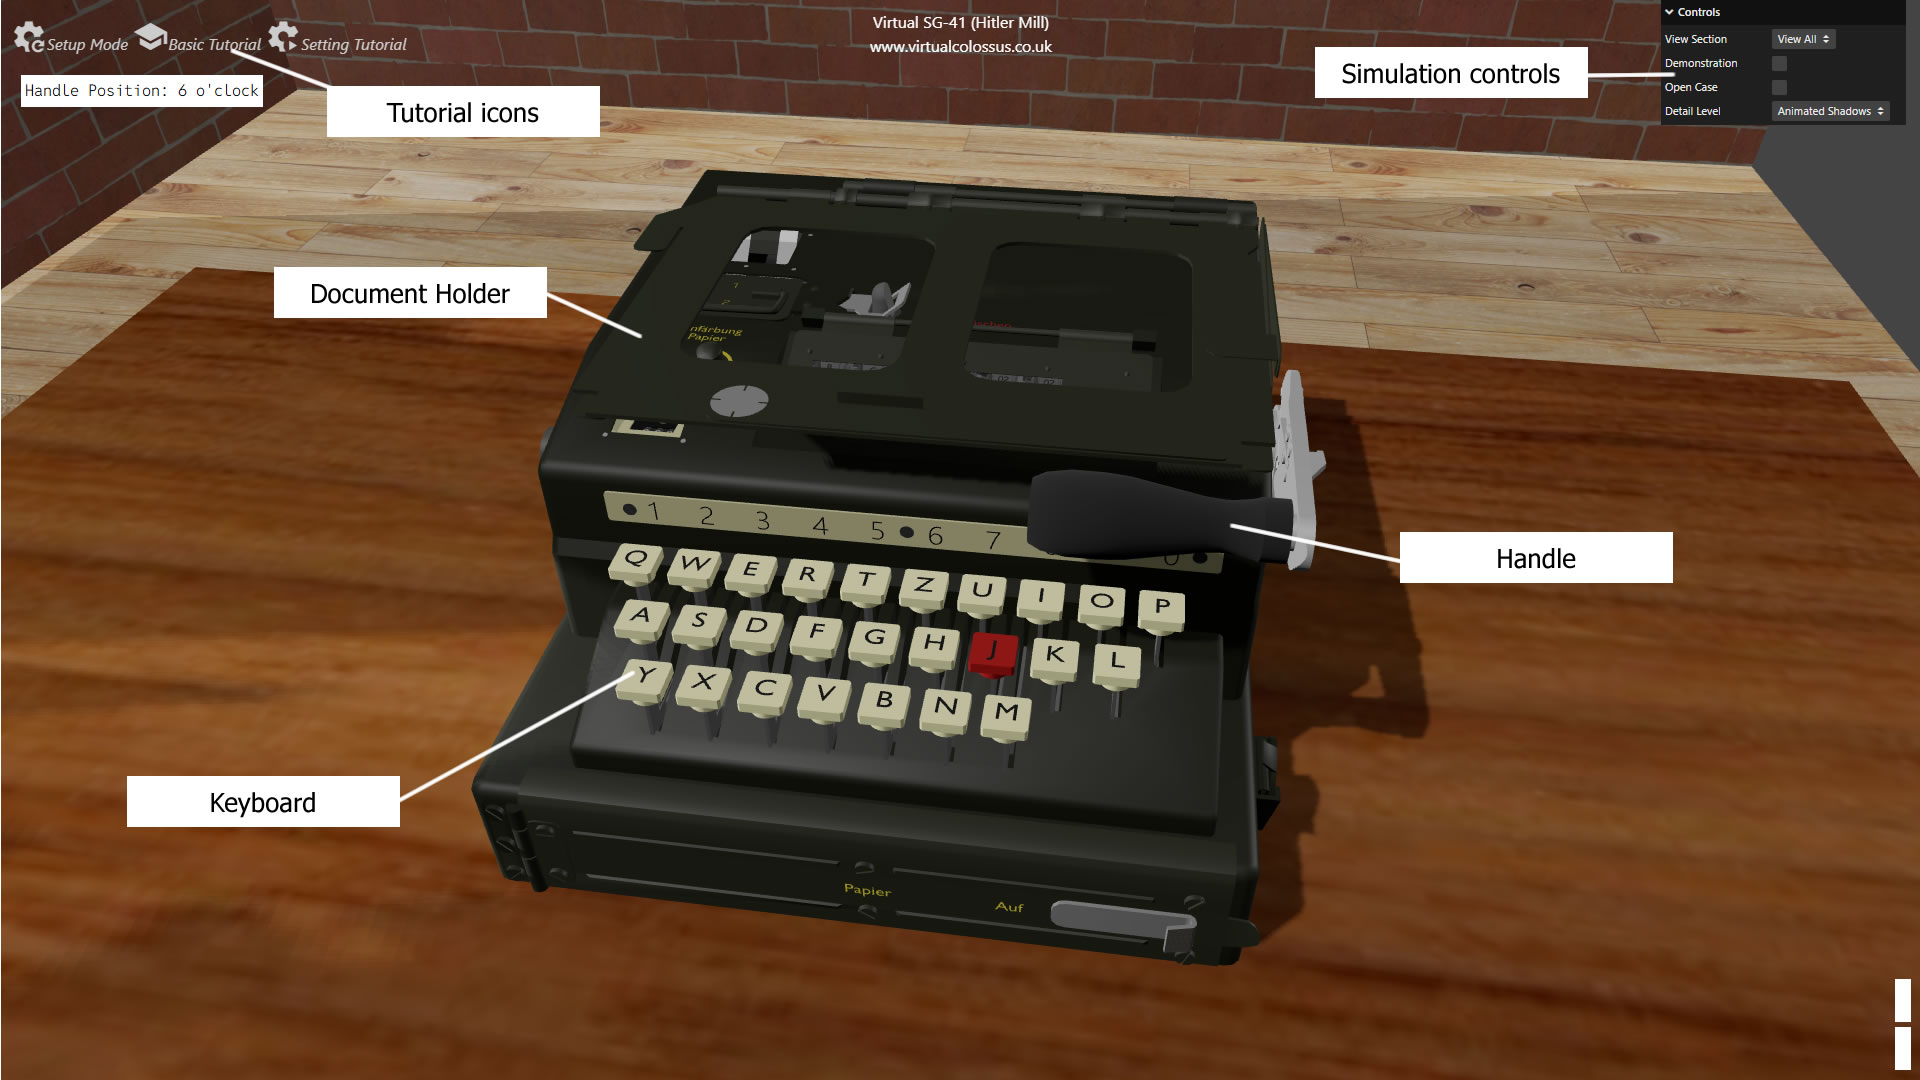
The first thing you'll want to do is unpack the SG-41 so it's ready for use. You can interact with Virtual SG-41 by moving your mouse cursor over the device and looking for where the cursor changes to a finger pointer.
Click once on the Handle to unfold it into the active position. This handle is likely to be the reason that this machine gained it's name as the "Hitler Mill" as it looks a bit like a coffee grinder!
Click once on the Document Holder to raise it up so that it locks into place ready to hold your work that needs enciphering.
Enciphering your first message
Before you can turn the handle, you must press a single key on the keyboard which will lock down. Try pressing the S key now
Now the handle mechanism has been released so click on the handle once or press the Enter key on your computer keyboard to turn it a full 360 degrees and encipher your letter S. A copy of the two paper tapes are shown in the bottom right of the screen, the SG-41 prints two tapes; one for the plaintext and one for the encrypted message. If you have Virtual SG-41 at it's default start settings, you should see the top tape listing the S key you pressed and the encrypted letter I on the bottom tape.
For each turn of the handle, the internal rotors step in a complex pattern, changing the next encryption calculation. Try pressing the letter G this time, then turn the handle to encipher it. The resulting enciphered letter should be the letter D.
You may notice that there is no space bar on this keyboard! Instead, the letter J (marked as a red key) was used as the space character. In the German language, the J is rarely used and can sometimes be replaced with the letter I and still be readable. Press the J key to enter a space and again turn the handle. The encrypted letter for this position is the letter T.
If the user wanted to send a number, they would normally just write out the word for each number. For example, try enciphering the number FORTY ONE, remembering to put the J between the two words. Note that on the enciphered tape, the characters are automatically spaced into five letter groups to make it easier to read and to count how many letters have been encrypted. If you are used to a UK/USA keyboard, note that in Germany (even today), the Z and Y keys are swapped over.
If all has gone well, then your message tape should be showing IDTVP EFQGC WS. If you look the the front-left of the top part of the machine, you might see the counter which keeps track of how many letters you have encrypted/decrypted. It should be showing the number 012 to show that you've just entered twelve letters (including spaces).
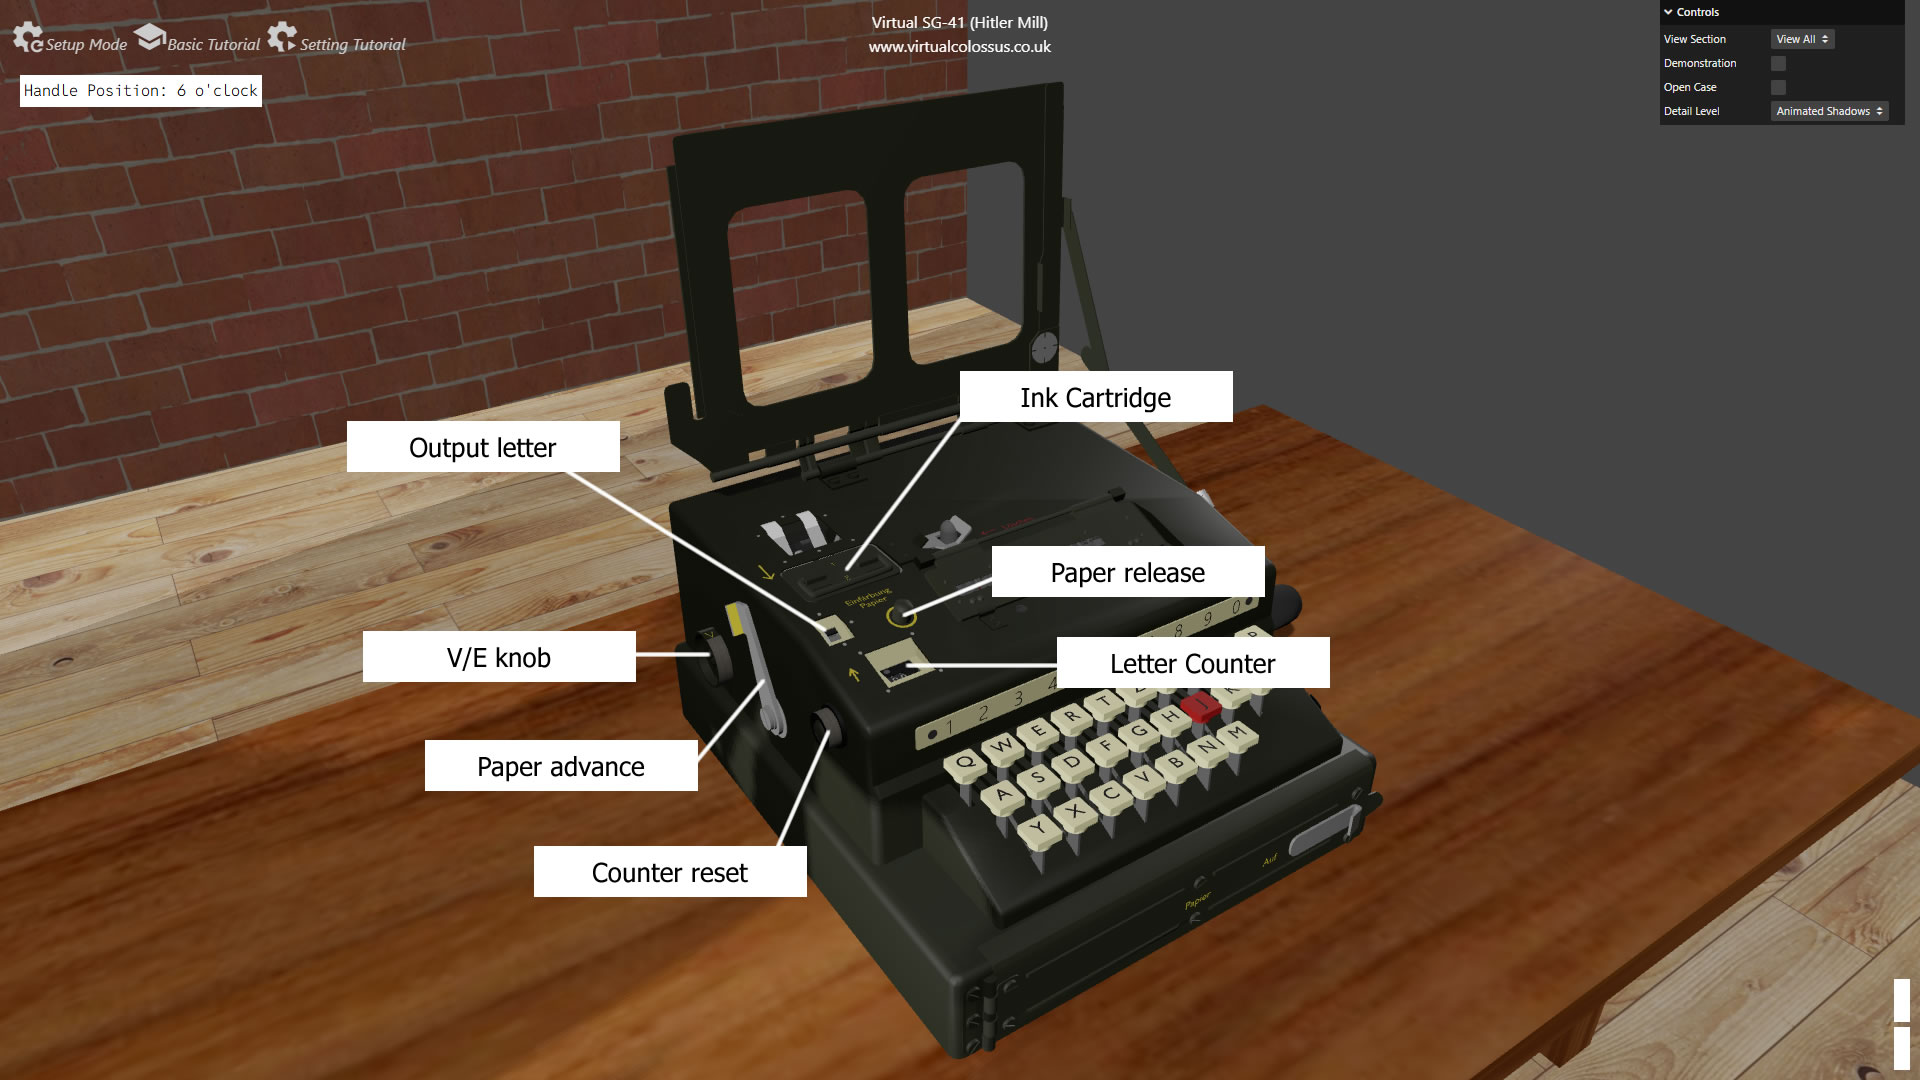
Take a look at the tapes in the back-left of the machine, you may just be able to see the mesasge starting to appear from the tapes on the actual machine. To see the full message that's been typed, there is both a paper advance lever and a paper release button. Turn the machine around (click on the background and drag) so you can find the paper advance lever on the left-side of the machine, it's a grey lever with a yellow tab on top. Click on this lever to feed an amount of paper from the printers, you may need to do this more than once to view the whole message. This would have been sent to the recipient via Morse code over radio.
Deciphering the message
To decipher this message, whether on another distant machine, or on this one to test, we need to do a few steps to set the SG-41 to decipher mode.
Firstly, there is a knob on the left-hand side of the machine at the rear which has the yellow letters V/E. Click on this knob to change the value from V to E (Verschlüsselung in German means encryption, Entschlüsselung means decryption).
Next, we want to reset the counter back to 000. Click on the Counter reset knob several times to turn the counter until it shows 000.
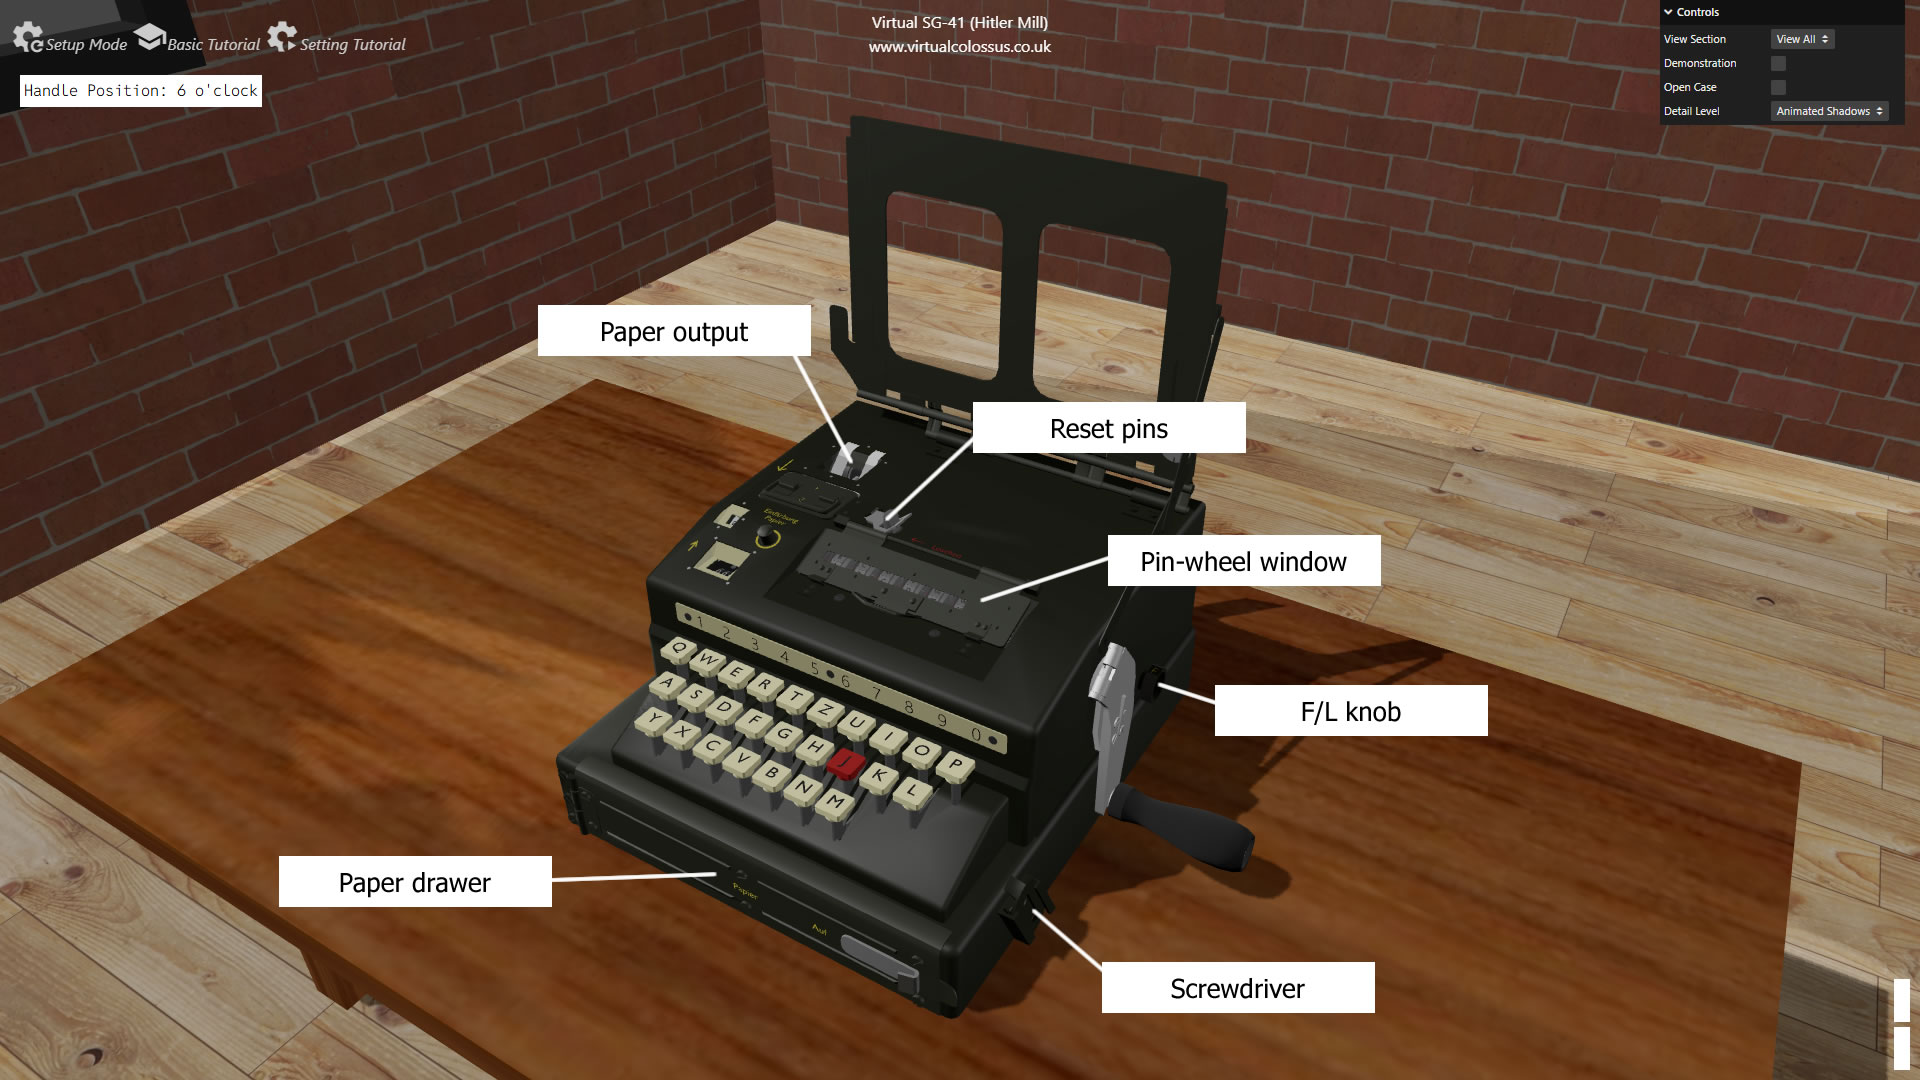
To correctly decipher the message we created, the SG-41 pin-wheels must be set back to the initial setting. Click on the pin-wheel window to open up the cover to show the wheels.
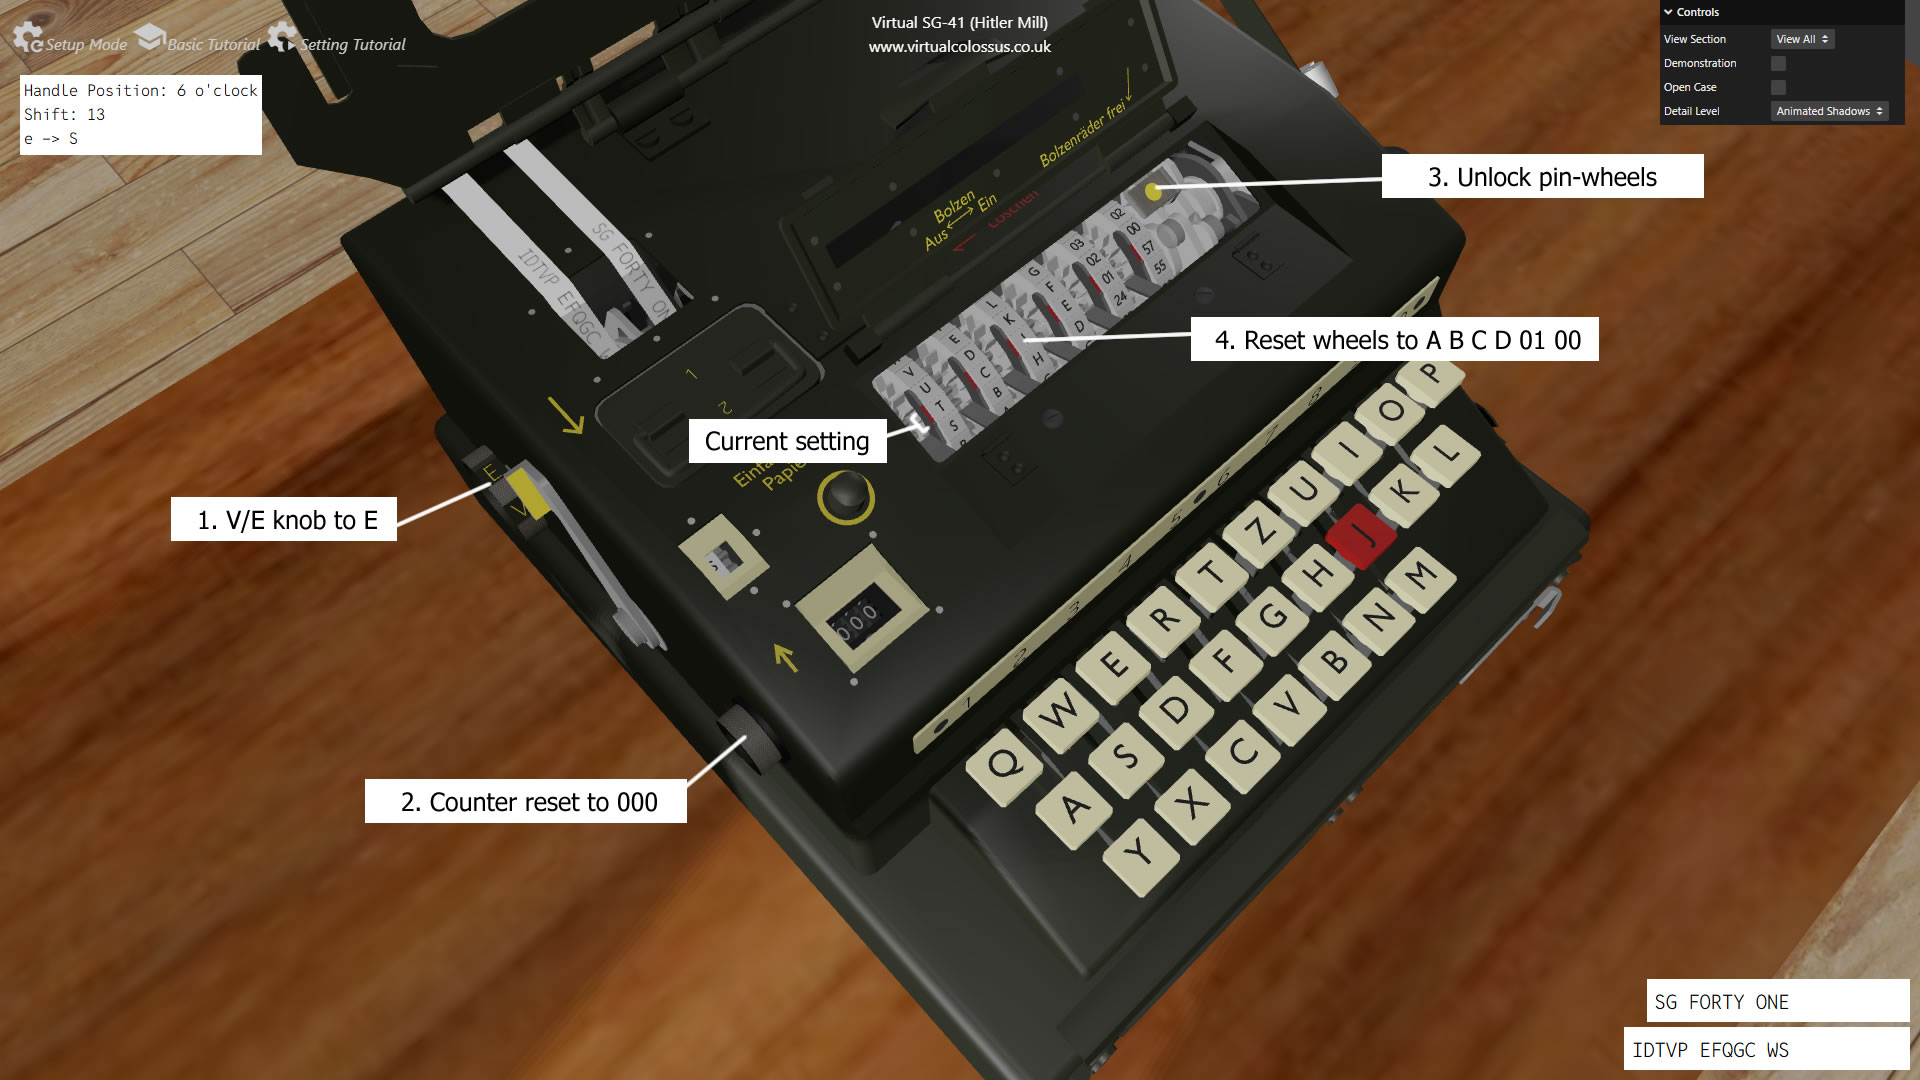
The default External key setting when Virtual SG-41 loads is A B C D 01 00 (the start values on the six pin-wheels is called the External Key) so we need to set each wheel back to match. If you try to drag the pin-wheels, you might see that they don't currently move, this is because they are locked in place by the mechanism and you need to press the release button to be able to set them manually. Press the button to the right of the pin-wheels (shown above with the yellow dot) which releases the pinion gears and rack mechanism allowing the wheels to be rotated.
You can now change each of the pin-wheels. To rotate them, click on the pin-wheel you want to move then drag up or down to change the setting. You may need to click/drag a few times to get back to the correct start setting. The current setting will be shown in the window when the pin-wheel window is closed or there is a red mark just to the left of each wheel to show the current setting position. Change each wheel until you have A B C D 01 00 as your initial setting. Don't worry about pressing the pin-wheel release button again afterwards, the mechanism will automatically re-engage when the handle turns.
Now we are ready to decipher our message, this time enter each key on our message IDTVP EFQGC WS turning the handle once for each letter. Note that the spaces in the message are just to help with the legibility of the message and should NOT be typed as the letter J this time! The spaces are already encoded within the message letters.
If you do this correctly, you should see the typed enciphered text on the left hand tape with the deciphered plain text on the right. Note how in the E decipher mode, the SG-41 cleverly reverses the tapes so that even though this time you were typing the enciphered message, the enciphered text always appears on the left hand tape and the plain text always on the right!
A button is available on top of the machine marked Einfärung Papier which releases the tape and allows it to be pulled out of the machine and torn off along the top of the window.
Changing the paper
The paper for the two printers is stored in a section beneath the machine, Click on the grey handle on the drawer to open it
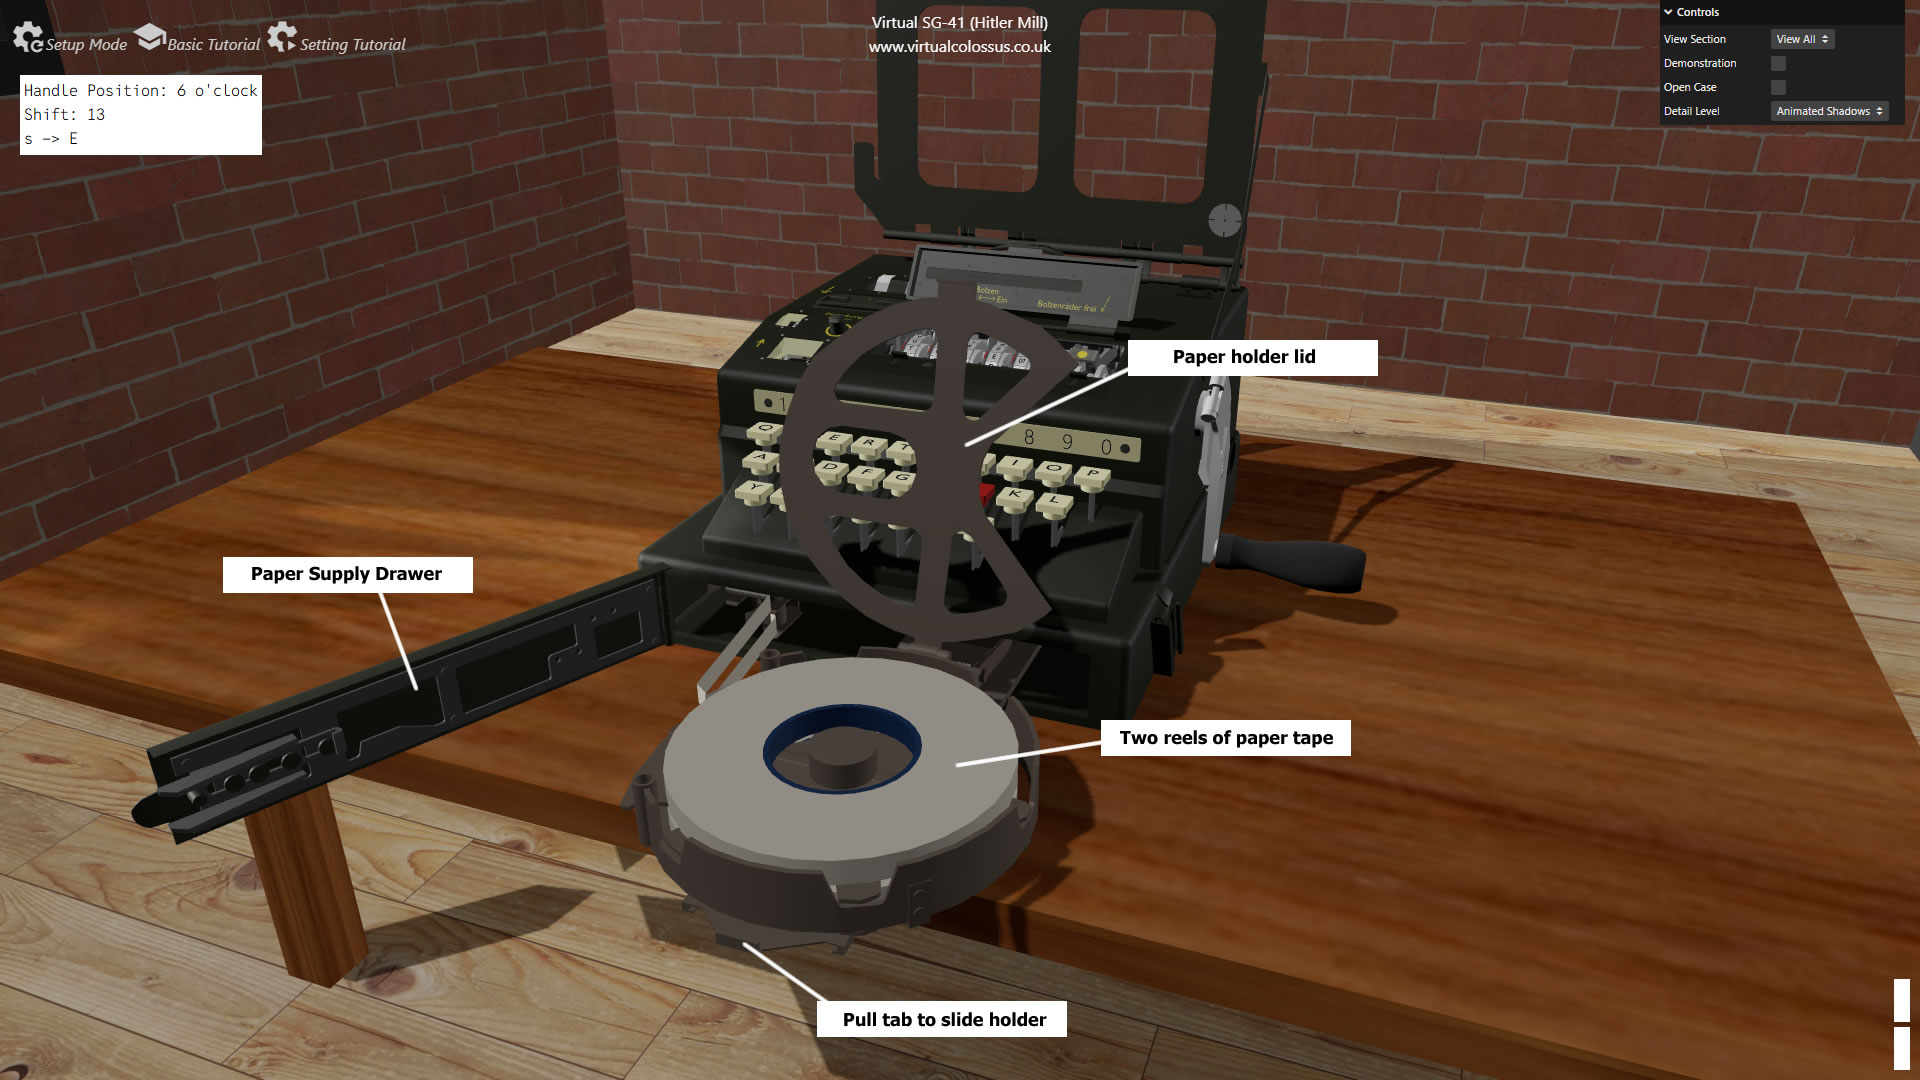
The paper tape reels are mounted on a slide so the operator would then pull these out using the tab at the front. Slide the paper reels out by clicking on the tab on the right of the interior of the drawer
Two tapes are in the holder, one on top of the other with the top of the holder swinging open to allow access. On Virtual SG-41, you'll never run out of paper though! Clicking the tape holder or drawer cover will return everything to it's place ready for use.
The ink for the printer is held within rollers in a cartridge on top of the machine, you can see it the top of it with a handle and marked 1 and 2 in yellow.
If the print was starting to look a little faded, you could switch to the second side of the cartridge to continue printing. On Virtual SG-41, just click on the top of the ink cartridge to see it swap over to the alternate side. The ink rollers within would have been replenished from an ink pad regularly.
If you ran out of ink completely, it was still possible to use the SG-41! The encrypted letter is shown on the white wheel through a small window after the encryption takes place (middle left of the machine).
Setting the Internal key
A new External Key (the start values on the pin-wheels) was set differently for each message, but on a regular basis, the actual pin settings of each pin-wheel would have been changed to completely alter how the message is enciphered. This is called the Internal Key.
This page will go through how to set the Internal Key using the Virtual SG-41 Setup Mode, but you can also learn this with the interactive tutorial on the simulation itself, just click on the button marked "Setting Tutorial"
The first step is to click the simulation button in the top left called "Setup Mode", this will open up the pin-wheel window on the top of the machine (if you haven't already), show the key sheets and put you in a good viewing position to set the Internal Key.
Around the outside of each pin-wheel are pins which can be set inactive (pushed through to the left) or active (to the right). The first two pin-wheels have 25 pins, the middle two have 23 pins and the two right hand rotors have 24 pins. Press the yellow dot marked button which is indicated with the words "Bolzenräder frei". This releases the mechanism so the pin-wheels can be turned.
Before you start settings the pins, the SG-41 has the option to reset them all to inactive. You can either do this without having to wait by clicking the option on the right "Quick Reset" or watch it being done fully by clicking the "Auto Reset" option and then wait while Virtual SG-41 does this for you using the SG-41's built-in reset mechanism.
On the left of the screen is an example of a key sheet (Schlüssel für Gerät 41) which would have been replaced monthly. It comprises of two sheets, one with a set of 6 random characters against each day of the month and a second sheet with the 26 lines of active/inactive settings marked A-Z.
Some real key sheets were discovered recently in the Czech archives which are shown below. The article about this find and more information can be found here: Eugen Antal, Carola Dahlke & Robert Jahn (01 Dec 2025): Revealing secrets from WWII: the original German instructions of Schlüsselgerät 41, Cryptologia, DOI:10.1080/01611194.2025.2557311
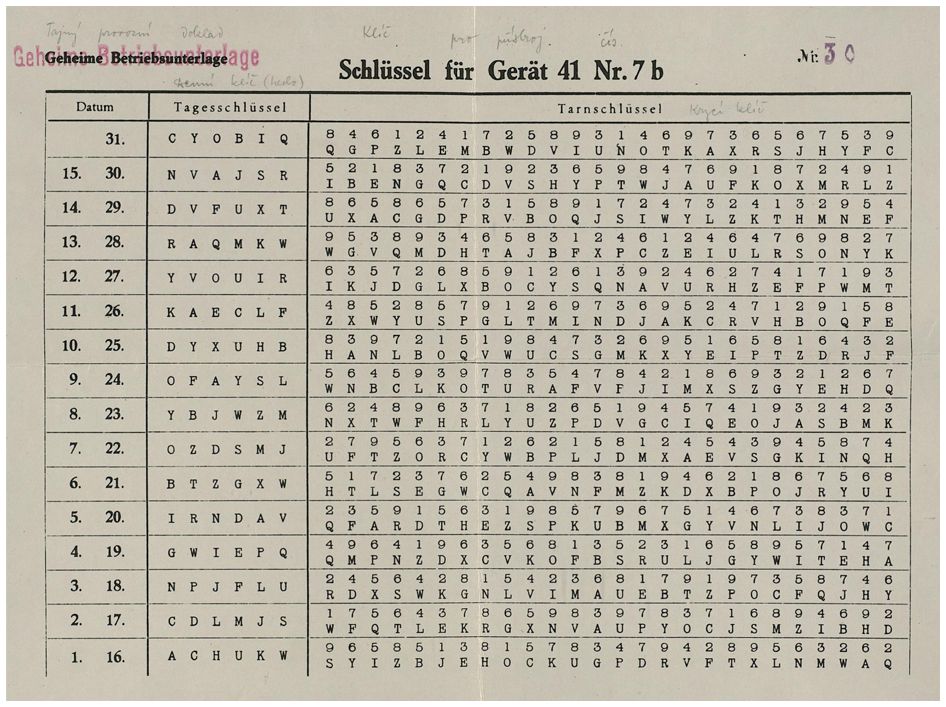
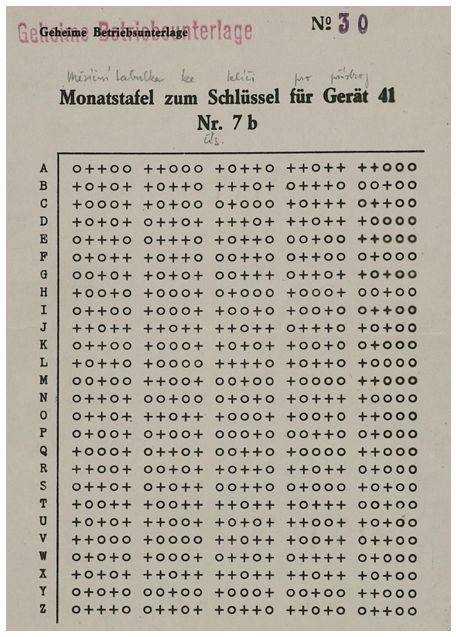
Let's assume today is the 22nd, (today's date will automatically be highlighted for you in bold but click on the row marked 7 22 OZDSMJ and it will be selected), you should see 6 letters marked. On the second sheet, you would them pick the 6 lines of pin settings against those letters. For example, for the 22nd, the letters are O Z D S M J, so you would set the first pin-wheel to the settings shown in the O row on the second sheet. Then, set the second pin-wheel to the settings for the Z row and so on, the correct pin-wheel settings are showing automatically for you at the bottom (Monatstafel).
Look at the first column A of the pin-wheel setting sheet (the section at the bottom) which has a set of 6 rows of o/+ signs. The o means to set the pin to the left (inactive) and the + means to set the pin to the right (active). So, in this case, we need to set the first pin-wheel position (A A A A 01 00) to have just the 3rd and 6th rotors active. On Virtual SG-41 to help you, the pins themselves will highlight in red/green to show which are currently correct or need moving. In real life, the SG-41 wasn't so helpful and you had to set all of these by hand using the screwdriver mounted on the front-right of the machine.
To change the active/inactive setting on a pin, just click on it with your mouse. Click both red pins until you have the right setting.
Now, you just need to do the same thing again, but for each one of the positions on every pin-wheel! Try moving the first pin-wheel to the letter B, you'll see the correct position you're meant to be setting shown in blue on the Montstafel sheet. The B setting for row O is a + (active), so this needs to be pushed through to the active side (right).
You can either do this one rotor at a time (remember, you've reset all of the pins to inactive, so you only need to set the ones marked with a + sign). Alternatively, Virtual SG-41 has a button marked "Next Position" on the right side of the screen which will step all the pin-wheels one step and you can set them that way.
Continue to set all the pins for each pin-wheel (or if you get bored, click the Auto Set button which will do it all for you!). Once they're all set correctly, then the Internal Key is now set.
If you're wondering why the last two pin-wheels are marked as numbers rather than letters like the rest, the answer given in the article linked below states that each station in a network who had an SG-41 would have been given a station number. This was a two-digit number (eg 18 37) which was changed each quarter (4 months) and this was set on the fifth and sixth wheels when sending. When decrypting, you would set the last two wheels to the settings of the sending station. See Eugen Antal, Carola Dahlke & Robert Jahn (01 Dec 2025): Revealing secrets from WWII: the original German instructions of Schlüsselgerät 41, Cryptologia, DOI:10.1080/01611194.2025.2557311
Looking inside the SG-41
This simulation has duplicated the interior mechanism and movement of the SG-41 so you can learn about how it works and marvel and the technology of the time! To view the interior, click the checkbox in the top right control panel "Open Case". The interior of the real machine can be accessed by removing each of the levers and knobs on the outside, then removing a few small screws. Try enciphering a few letters while the case is off and see the many parts that are involved in this mechanism. It's very busy in there!
The "View Section" drop down allows you to just show specific parts of the machine with the rest transparent or hidden.
Click the "Demonstration" checkbox and the SG-41 will continuously type SECRET MESSAGE out automatically so you can see everything working.
If you find that your computer is struggling to show all of the mechanism smoothly, try adjusting the detail level down.
AR version (Android phones only)
An AR version (where the SG-41 can be placed on a table using your phone camera) can be accessed by running Virtual SG-41 on a recent Android device (recommend Google Chrome). On loading the simulation, a button should appear at the bottom of the screen "Start AR".
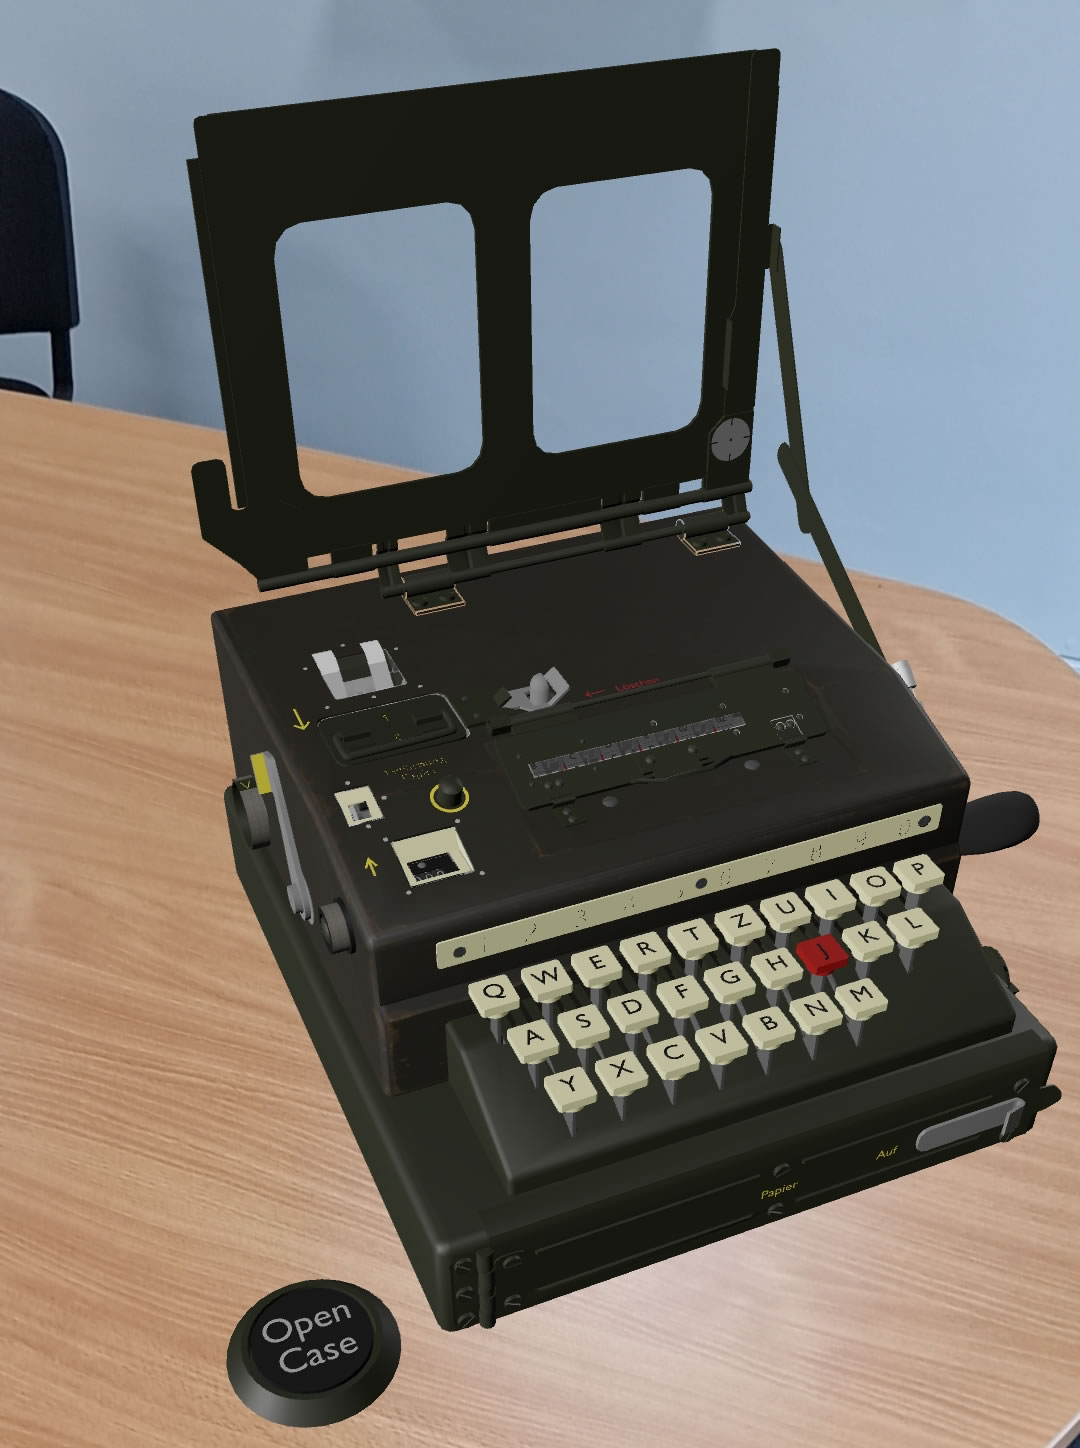
Find a well lit, open flat area (eg a table) and move the phone around until you see a blue circular recticle showing. Tap the screen to place the SG-41 model at the location. Tap on the paper holder and handle to open them. Try pressing a key then clicking the handle to encipher a letter. A large button is placed at the lower left side of the machine which will open up the top cover so you can see it working internally.
Unfortunately, the iPhone does not currently support WebXR for AR so cannot run natively on the browser